[ExpertPhotography is supported by readers. Product links on ExpertPhotography are referral links. If you use one of these and buy something, we make a little bit of money. Need more info? See how it all works here.]
10. Architecture Photography Composition: 10 Tips for Using a Wide Angle Lens to Capture a Bigger Picture
It’s not a hard and fast rule. But, most of architectural photography has been done with wide or ultra wide lenses. There is a reason for this. The context is as important as the architecture itself. It sets the mood of the image. A wide angle lens will let you add that background element to your image. It tells the viewers what this architecture is all about and how it fits in its overall environment.
9. Use Leading Lines to Create a Point of Interest
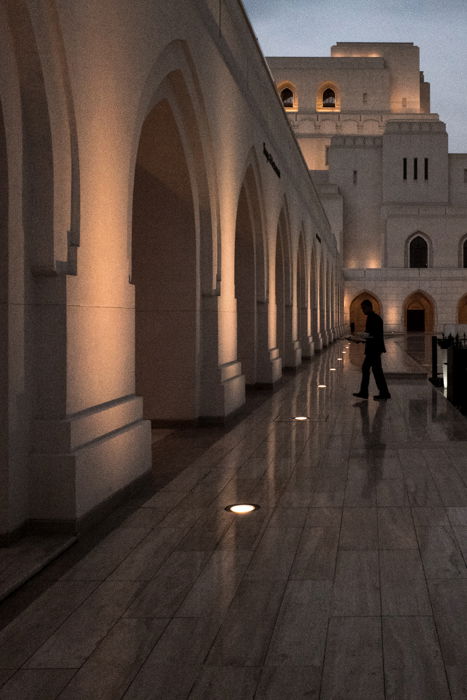
Simple architecture shots often end up boring. It will make much more sense if you include some point of interest in your image. And even better if you use leading lines to direct viewers’ attention towards it. The lines don’t have to perfectly converge on your subject. Use something to direct viewer’s attention in a specific direction. In the above architecture shot, I used the person as a point of interest. I made sure most lines were converging towards him. Otherwise, this picture would be a dull snapshot of very unique architecture.
8. How to Add a Sense of Scale in Architecture Photography
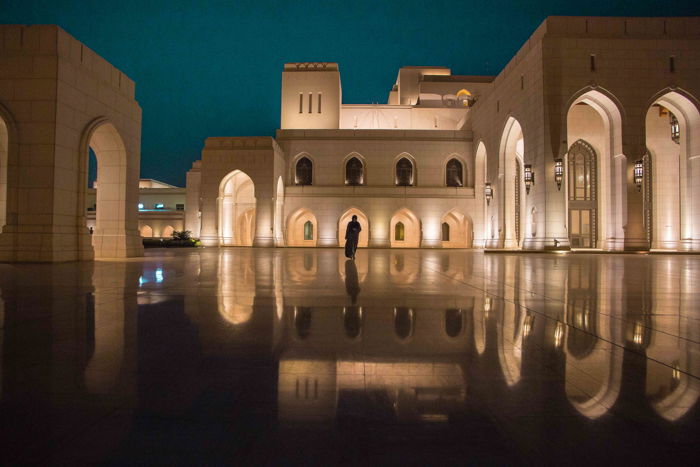
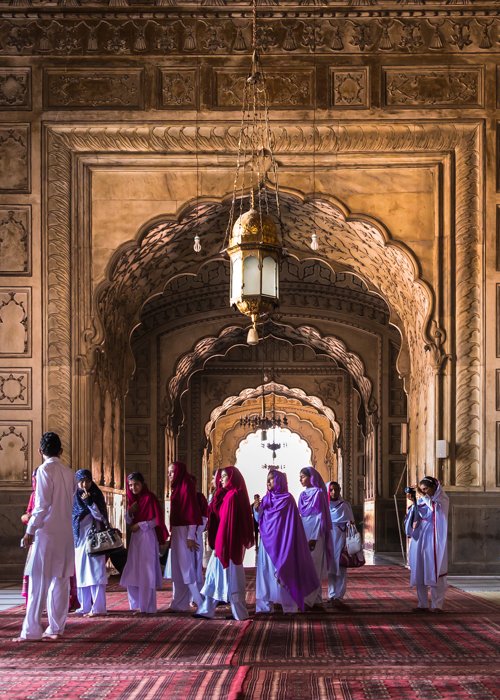
Unless you are shooting indoors, most of the architecture we shoot is massive in nature. You need to emphasise that scale. Try to include something in your frame that everyone knows how big it is. It could be a human, a car or even a tree. Your viewers’ mind will compare the size of the known subject to the architecture. And your subject will appear grand. Also, as a fun exercise, you can play with perspective to alter reality. You can place that scale element closer to make it big enough to make the architecture seem smaller. I included a man walking in this mosque image above to show how big the building is. Imagine this photo without the human element and you can no longer tell the exact size. Try to use this technique whenever you shoot architecture from outside.
7. Focus on the Details for a Unique Perspective
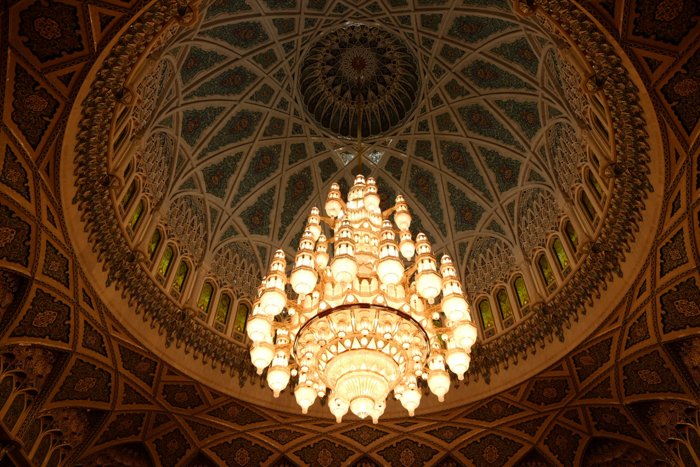
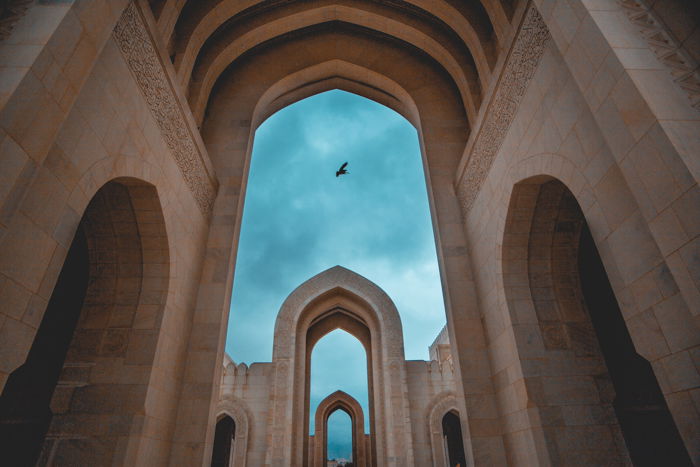
When you photograph architecture, you focus more on the main building and the environment. And that is OK. It depends on what the purpose of your shot is. But sometimes, it’s the tiny details that are very intriguing. Whenever you shoot architecture, cover the whole building as a complete story. Start to shoot from the outside. Cover the building in its surroundings. Then move on to specific sections and all the way to particular detailed mid shots. This approach will give you a lot of options to choose from when you are editing your final images. Whether you are working for a client or on a personal project, try to cover every aspect you can think of. I happened to be at the Grand Mosque in Oman. It has a beautiful architecture as a whole and a very pleasing Chandelier, too. I thought it would be more interesting to photograph the chandelier alone. This drew attention to its intricate details.
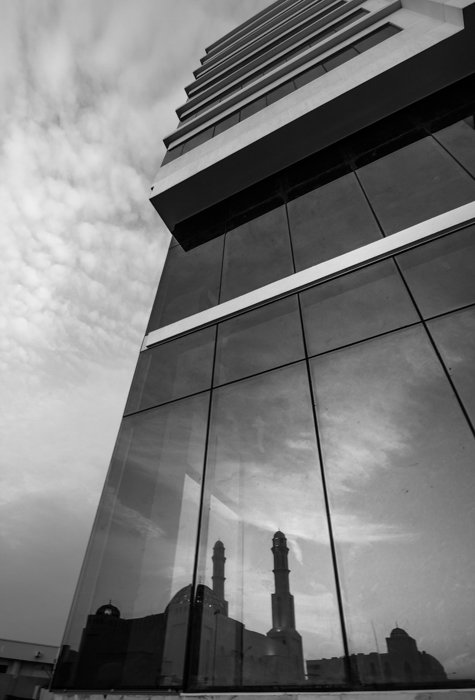
6. Add Reflections for a Less Traditional Shot
Look out for unique reflections in your frame. Reflection in general add a sense of symmetry or contrast to your image. Most of the building these days have a lot of glass on them. Try to look for reflections that either complement or create some juxtaposition. If not glass, then puddles of water on the street or any shiny surface. Try to create something interesting to spice up a traditional architecture image. In the above picture, I photographed a new urban building. The reflection of a traditional Islamic mosque created juxtaposition.
5. How to Use the Blue Hour to Your Advantage
Buildings with artificial lights look fascinating in the blue hour. To show lights, the sun needs to set, which makes the entire sky black. Blue hour is roughly 30 minutes before sunrise and for the same amount of time after sunset. This vibrant blue in the sky looks much more colorful in pictures. It can add interest to your compositions. Modern urban architecture is a great candidate for blue hour photography.
4. Include Panoramas
Sometimes the ultra wide angle isn’t enough to capture a complete scene or structure. This is where panoramas come in. Panoramas look good with symmetric compositions in general. This technique exaggerates the whole environment. So try to put the most important part of your subject in the middle. Since the middle shot is dead straight, it has the least distortion. So the resulting image will be realistic and it still lets you cover bigger subjects. You can experiment with vertical panoramas as well. You don’t need dedicated software to stitch a panorama. Lightroom and Photoshop let you create one with ease. And the best thing, the resulting file will be a RAW file too. This gives you complete control in post process. Start with a 3 or 5 image panorama. Make sure to overlap at least 30% of each image to give enough room for your software to make a correct panorama.
3. Experiment With Angles for Different Perspectives
Your perspective has the most impact on your final image. A different angle can change your composition. Yes, keeping your camera level is very important as it reduces distortion. But rules are meant to be broken. A little distortion is not bad. So embrace it. And use it to your advantage. You can create dynamic compositions by changing your angle. Shoot straight as well as below or above your subject. Try tilting your camera upwards to exaggerate things a notch. But look out for very thin and longer structures like minarets. They will look quite awkward with distortion.
2. Incorporate Patterns for More Dynamic Compositions
Patterns and repetitions create a dynamic composition, especially in architecture photography. They add a sense of rhythm to your image. The patterns are easy to find. If you are photographing urban buildings, then there are plenty of windows and floors. Use these to create repetitions. With old traditional architecture, there are doors and archways. The key is to stop looking at the building or structure as a whole. Just look for smaller sections for repeating patterns. Even if a building looks ugly at first. You can find some beautiful patterns if you look close enough. If the patterns don’t create enough interest, look for overcast days with clouds. You can even use long exposure to create interesting backgrounds.
1. Add a Human Element
Places with exciting architecture are filled with tourists. Yes, sometimes it’s a bit distracting, but the people and tourists are not bad all the time. Sometimes adding humans to your composition makes it more authentic and natural. People can relate to it better. It adds the element of scale to your composition. It shows the activities going around that architecture. Try to include people only if you want to show some activity. If there are too many people, come at sometime when there will be less. [ExpertPhotography is supported by readers. Product links on ExpertPhotography are referral links. If you use one of these and buy something we make a little bit of money. Need more info? See how it all works here.]
Technical Considerations for Architecture Photography
After all the aesthetic tips, here are a few technicalities. These deal with distortion, noise and sharpness, common problems with architecture photography.
5. Level Your Camera for Least Distortion
Keep your camera perfectly level to avoid distortion. Unless you’re exaggerating on purpose. Architectural photography is all about wide angle lenses and even the slightest tilt can introduce uncontrollable distortion. A tripod with a bubble level is a handy addition to your camera bag in this case.
4. Use a Remote Shutter Release
For tack sharp results, avoid using the shutter button. An inexpensive workaround is to use the 2 second timer function. Almost all cameras have this feature available. You don’t have to carry any extra remote for this. But sometimes you are looking to click exactly at a specific time. In that case use a shutter release. It’s cheap and it will make a ton of difference.
3. Use a Tripod for Slower Shutter Speeds
I have covered places where I was not the official photographer. I was not allowed to carry equipment like tripods or even bigger cameras. This meant I had to bump up my ISO to keep my shutter at a reasonable speed to take sharp images. But this comes at the cost of more noise. Always use a tripod if you can. It will make your images sharp and crisp. You can use the lowest ISO available and you don’t have to worry about shutter speed.
2. Try a Panorama If You Don’t Have a Wide Angle Lens
Lenses are expensive, especially the ultra wide ones. Don’t let this stop you if you are on a tight budget. The panorama is a good option in this case. Try shooting panoramas with a basic 18-55mm kit lens at 18mm. Use a 3 or 5 shot panorama and you are good to go.
1. Use Lightroom/Photoshop to Correct Distortion
If you still end up with a somewhat distorted image, correct it in post. Lightroom and Photoshop have distortion correction algorithms that will save your photo. Just keep in mind not to overdo it. It will look unnatural. You can’t avoid distortion altogether. You have to embrace it to some level.
Conclusion
Architecture photography is abundant and timeless in nature. You don’t have to travel to exotic places to find architectural sites. Yes, traveling helps. But no matter where you live, you can still find beautiful architecture to photograph. You don’t need all the equipment, or the best camera or lens. Use the tips in this article on how to be resourceful.


title: “10 Tips For Better Architecture Photography Composition” ShowToc: true date: “2023-02-10” author: “Inez Parker”
[ExpertPhotography is supported by readers. Product links on ExpertPhotography are referral links. If you use one of these and buy something, we make a little bit of money. Need more info? See how it all works here.]
10. Architecture Photography Composition: 10 Tips for Using a Wide Angle Lens to Capture a Bigger Picture
It’s not a hard and fast rule. But, most of architectural photography has been done with wide or ultra wide lenses. There is a reason for this. The context is as important as the architecture itself. It sets the mood of the image. A wide angle lens will let you add that background element to your image. It tells the viewers what this architecture is all about and how it fits in its overall environment.
9. Use Leading Lines to Create a Point of Interest
Simple architecture shots often end up boring. It will make much more sense if you include some point of interest in your image. And even better if you use leading lines to direct viewers’ attention towards it. The lines don’t have to perfectly converge on your subject. Use something to direct viewer’s attention in a specific direction. In the above architecture shot, I used the person as a point of interest. I made sure most lines were converging towards him. Otherwise, this picture would be a dull snapshot of very unique architecture.
8. How to Add a Sense of Scale in Architecture Photography
Unless you are shooting indoors, most of the architecture we shoot is massive in nature. You need to emphasise that scale. Try to include something in your frame that everyone knows how big it is. It could be a human, a car or even a tree. Your viewers’ mind will compare the size of the known subject to the architecture. And your subject will appear grand. Also, as a fun exercise, you can play with perspective to alter reality. You can place that scale element closer to make it big enough to make the architecture seem smaller. I included a man walking in this mosque image above to show how big the building is. Imagine this photo without the human element and you can no longer tell the exact size. Try to use this technique whenever you shoot architecture from outside.
7. Focus on the Details for a Unique Perspective
When you photograph architecture, you focus more on the main building and the environment. And that is OK. It depends on what the purpose of your shot is. But sometimes, it’s the tiny details that are very intriguing. Whenever you shoot architecture, cover the whole building as a complete story. Start to shoot from the outside. Cover the building in its surroundings. Then move on to specific sections and all the way to particular detailed mid shots. This approach will give you a lot of options to choose from when you are editing your final images. Whether you are working for a client or on a personal project, try to cover every aspect you can think of. I happened to be at the Grand Mosque in Oman. It has a beautiful architecture as a whole and a very pleasing Chandelier, too. I thought it would be more interesting to photograph the chandelier alone. This drew attention to its intricate details.
6. Add Reflections for a Less Traditional Shot
Look out for unique reflections in your frame. Reflection in general add a sense of symmetry or contrast to your image. Most of the building these days have a lot of glass on them. Try to look for reflections that either complement or create some juxtaposition. If not glass, then puddles of water on the street or any shiny surface. Try to create something interesting to spice up a traditional architecture image. In the above picture, I photographed a new urban building. The reflection of a traditional Islamic mosque created juxtaposition.
5. How to Use the Blue Hour to Your Advantage
Buildings with artificial lights look fascinating in the blue hour. To show lights, the sun needs to set, which makes the entire sky black. Blue hour is roughly 30 minutes before sunrise and for the same amount of time after sunset. This vibrant blue in the sky looks much more colorful in pictures. It can add interest to your compositions. Modern urban architecture is a great candidate for blue hour photography.
4. Include Panoramas
Sometimes the ultra wide angle isn’t enough to capture a complete scene or structure. This is where panoramas come in. Panoramas look good with symmetric compositions in general. This technique exaggerates the whole environment. So try to put the most important part of your subject in the middle. Since the middle shot is dead straight, it has the least distortion. So the resulting image will be realistic and it still lets you cover bigger subjects. You can experiment with vertical panoramas as well. You don’t need dedicated software to stitch a panorama. Lightroom and Photoshop let you create one with ease. And the best thing, the resulting file will be a RAW file too. This gives you complete control in post process. Start with a 3 or 5 image panorama. Make sure to overlap at least 30% of each image to give enough room for your software to make a correct panorama.
3. Experiment With Angles for Different Perspectives
Your perspective has the most impact on your final image. A different angle can change your composition. Yes, keeping your camera level is very important as it reduces distortion. But rules are meant to be broken. A little distortion is not bad. So embrace it. And use it to your advantage. You can create dynamic compositions by changing your angle. Shoot straight as well as below or above your subject. Try tilting your camera upwards to exaggerate things a notch. But look out for very thin and longer structures like minarets. They will look quite awkward with distortion.
2. Incorporate Patterns for More Dynamic Compositions
Patterns and repetitions create a dynamic composition, especially in architecture photography. They add a sense of rhythm to your image. The patterns are easy to find. If you are photographing urban buildings, then there are plenty of windows and floors. Use these to create repetitions. With old traditional architecture, there are doors and archways. The key is to stop looking at the building or structure as a whole. Just look for smaller sections for repeating patterns. Even if a building looks ugly at first. You can find some beautiful patterns if you look close enough. If the patterns don’t create enough interest, look for overcast days with clouds. You can even use long exposure to create interesting backgrounds.
1. Add a Human Element
Places with exciting architecture are filled with tourists. Yes, sometimes it’s a bit distracting, but the people and tourists are not bad all the time. Sometimes adding humans to your composition makes it more authentic and natural. People can relate to it better. It adds the element of scale to your composition. It shows the activities going around that architecture. Try to include people only if you want to show some activity. If there are too many people, come at sometime when there will be less. [ExpertPhotography is supported by readers. Product links on ExpertPhotography are referral links. If you use one of these and buy something we make a little bit of money. Need more info? See how it all works here.]
Technical Considerations for Architecture Photography
After all the aesthetic tips, here are a few technicalities. These deal with distortion, noise and sharpness, common problems with architecture photography.
5. Level Your Camera for Least Distortion
Keep your camera perfectly level to avoid distortion. Unless you’re exaggerating on purpose. Architectural photography is all about wide angle lenses and even the slightest tilt can introduce uncontrollable distortion. A tripod with a bubble level is a handy addition to your camera bag in this case.
4. Use a Remote Shutter Release
For tack sharp results, avoid using the shutter button. An inexpensive workaround is to use the 2 second timer function. Almost all cameras have this feature available. You don’t have to carry any extra remote for this. But sometimes you are looking to click exactly at a specific time. In that case use a shutter release. It’s cheap and it will make a ton of difference.
3. Use a Tripod for Slower Shutter Speeds
I have covered places where I was not the official photographer. I was not allowed to carry equipment like tripods or even bigger cameras. This meant I had to bump up my ISO to keep my shutter at a reasonable speed to take sharp images. But this comes at the cost of more noise. Always use a tripod if you can. It will make your images sharp and crisp. You can use the lowest ISO available and you don’t have to worry about shutter speed.
2. Try a Panorama If You Don’t Have a Wide Angle Lens
Lenses are expensive, especially the ultra wide ones. Don’t let this stop you if you are on a tight budget. The panorama is a good option in this case. Try shooting panoramas with a basic 18-55mm kit lens at 18mm. Use a 3 or 5 shot panorama and you are good to go.
1. Use Lightroom/Photoshop to Correct Distortion
If you still end up with a somewhat distorted image, correct it in post. Lightroom and Photoshop have distortion correction algorithms that will save your photo. Just keep in mind not to overdo it. It will look unnatural. You can’t avoid distortion altogether. You have to embrace it to some level.
Conclusion
Architecture photography is abundant and timeless in nature. You don’t have to travel to exotic places to find architectural sites. Yes, traveling helps. But no matter where you live, you can still find beautiful architecture to photograph. You don’t need all the equipment, or the best camera or lens. Use the tips in this article on how to be resourceful.
