When you open an image in Adobe Photoshop, you see a grid of pixels composed of various colors. Together, these represent the color palette you can break down into color channels. The channels are separate layers of color information. Each one represents the color mode used on the image. We review how color and alpha channels work and how to use them. [Note: ExpertPhotography is supported by readers. Product links on ExpertPhotography are referral links. If you use one of these and buy something, we make a little bit of money. Need more info? See how it all works here.]
How Do Photoshop Channels Work?
First, it is important to understand the relationship between light, color, and how our eyes see it. Then we can understand how a color channel works,
Understanding Light and Color
The visible spectrum for humans is between ultraviolet light and red light. And it’s in a wavelength between 400 and 700 nanometers. It is estimated that we can distinguish up to 10 million colors. Two different types of cells inside our eyes are responsible for this process—rods, and cones. Darker environments stimulate rods. Brighter environments stimulate cones. Cones contain color-detecting molecules with red, green, and blue photopigments. The light reflected by a yellow object in daylight stimulates the red and green cones. These send a signal to our brains. And we process the number of activated cones and the strength of the signal. This allows us to see color. This process is named “Trichrome.” It is a result of thousands of years of human evolution and environmental adaptation.
Photoshop Color Modes
We can use a few color modes in Photoshop, like Grayscale, Index, Lab, or Multichannel. The RGB and CMYK color modes are the most used ones.
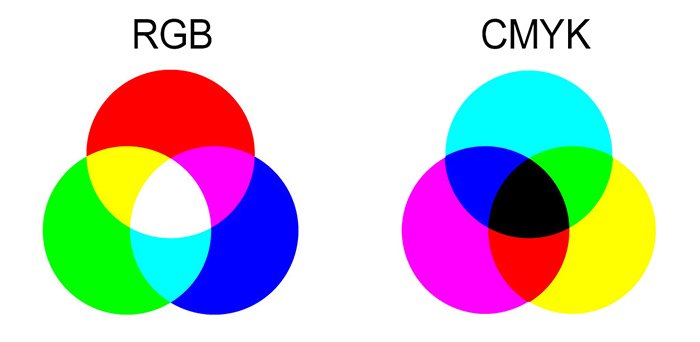
The RGB color mode is an additive process. It is created by combining different amounts of red, green, and blue. Values between 0 to 255 represent them. This mode is associated with digital displays on monitors, cameras, and scanners. The CMYK color mode is a subtractive process. It is created by combining the colors Cyan, Magenta, Yellow, and Key (Black) in different amounts. It is represented by percentage values and is associated with printer inks.
Where to Find Color Channels
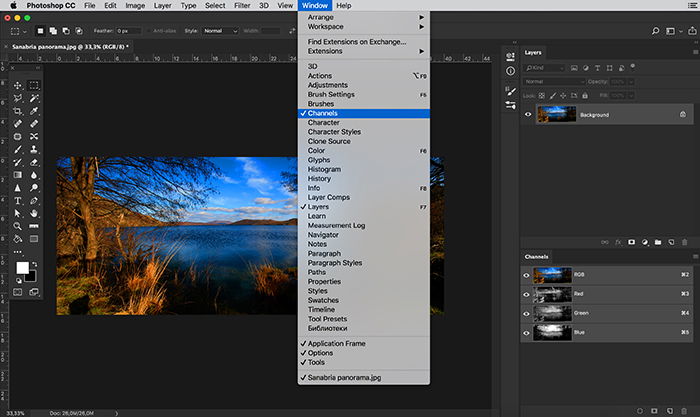
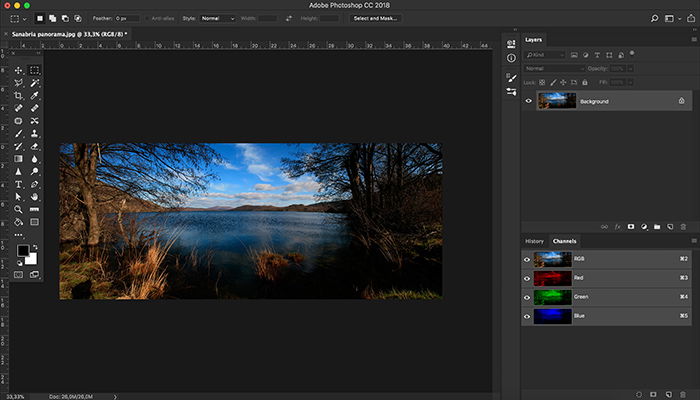
You can find Photoshop’s color channels palette window through the top file menu. Click Window > Channels. We will start in RGB mode (Image > Mode > RGB).
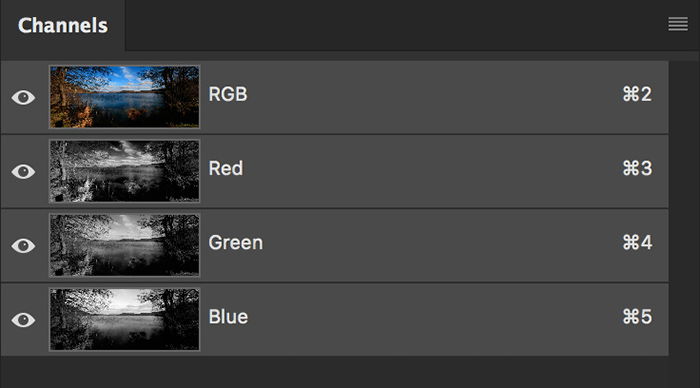
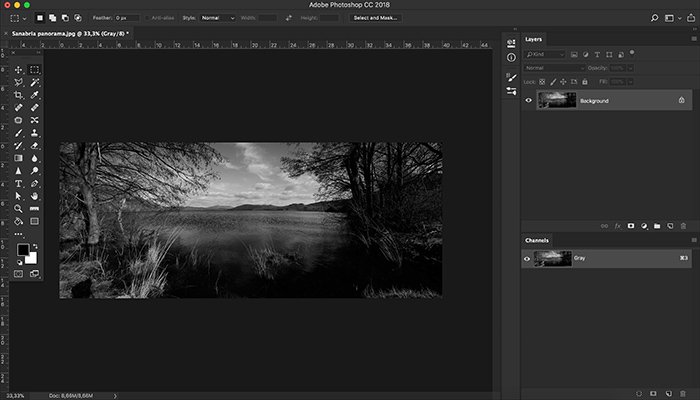
Each color in the color mode is now represented by a color channel represented by a grayscale image. There are Red, Green, and Blue channels. The brighter areas of the color channel contain more color. The darker areas represent less color.
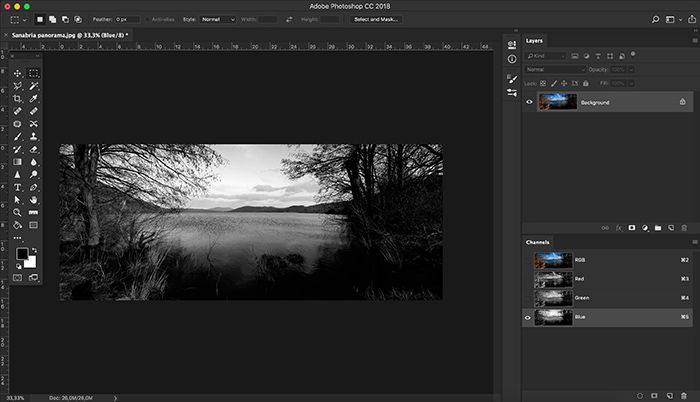
For instance, let’s look at the images above and below. The Blue channel is brighter than the Green or Red channels. This is because the image is composed mostly of this great blue sky reflected on the water. We can convert our image to a CMYK color mode (Image > Mode > CMYK). Then our palette is represented by four channels instead of three. It has Cyan, Magenta, Yellow, and Key (Black) channels. The bright and dark areas act like the RGB color mode above.
An image in grayscale color mode (Image > Mode > Grayscale) only has one channel.
How to Select and Edit Channels
Channels can be selected and edited by doing the following: You can paint on only one channel at a time. Paint white to add the selected channel’s color at 100% intensity. Paint with a value of grey to add the channel’s color at a lower intensity. Paint with black to remove the channel’s color. Grayscale images are the standard representation of channels. But there’s an option that lets channels be represented in color if you prefer. You can do the following:
How to Use Alpha Channels
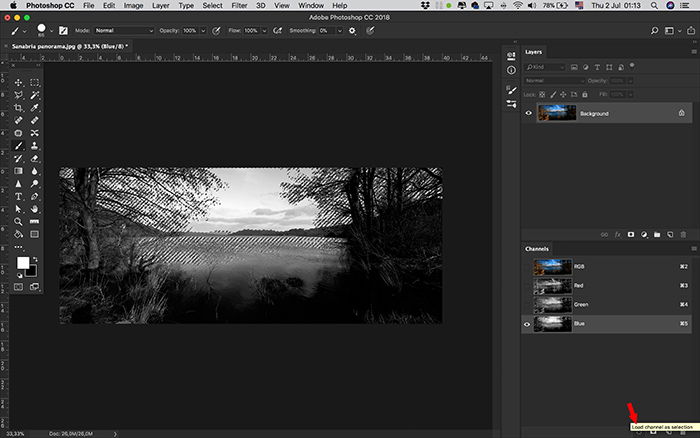
Besides color channels, Photoshop can also store alpha channel information. They are saved on the same palette. Alpha channels are a type of mask that can select levels of grey instead of an outline. This process is very to create complicated selections. A good example is to select the sky in this particular image. This would represent a challenge with standard selection tools. But it is simple with an alpha channel. It only needs two steps:
This alpha channel is then created below the others. You can use it as a layer mask and paint it to add or remove selection areas. And you can convert it to a selection anytime. This makes it possible to control the transparency for specific colors or selections. You can also drag alpha channels between documents. But both documents must have the exact same pixel dimensions. If that is not the case, you can adjust those dimensions with the Image > Image Size function or with the Crop tool (C).
How to Use a Stored Alpha Channel Mask
To use a stored channel mask, use the following steps: You can drag a selection from one open Photoshop image onto another. You can also create a new channel that Photoshop fills with black color by default.
Conclusion
Photoshop channels are a fun and powerful editing process with amazing results. Exploring these options will have a significant impact on your images.


title: “What Are Photoshop Channels And How To Use Them " ShowToc: true date: “2023-01-28” author: “Sue Kendall”
When you open an image in Adobe Photoshop, you see a grid of pixels composed of various colors. Together, these represent the color palette you can break down into color channels. The channels are separate layers of color information. Each one represents the color mode used on the image. We review how color and alpha channels work and how to use them. [Note: ExpertPhotography is supported by readers. Product links on ExpertPhotography are referral links. If you use one of these and buy something, we make a little bit of money. Need more info? See how it all works here.]
How Do Photoshop Channels Work?
First, it is important to understand the relationship between light, color, and how our eyes see it. Then we can understand how a color channel works,
Understanding Light and Color
The visible spectrum for humans is between ultraviolet light and red light. And it’s in a wavelength between 400 and 700 nanometers. It is estimated that we can distinguish up to 10 million colors. Two different types of cells inside our eyes are responsible for this process—rods, and cones. Darker environments stimulate rods. Brighter environments stimulate cones. Cones contain color-detecting molecules with red, green, and blue photopigments. The light reflected by a yellow object in daylight stimulates the red and green cones. These send a signal to our brains. And we process the number of activated cones and the strength of the signal. This allows us to see color. This process is named “Trichrome.” It is a result of thousands of years of human evolution and environmental adaptation.
Photoshop Color Modes
We can use a few color modes in Photoshop, like Grayscale, Index, Lab, or Multichannel. The RGB and CMYK color modes are the most used ones.
The RGB color mode is an additive process. It is created by combining different amounts of red, green, and blue. Values between 0 to 255 represent them. This mode is associated with digital displays on monitors, cameras, and scanners. The CMYK color mode is a subtractive process. It is created by combining the colors Cyan, Magenta, Yellow, and Key (Black) in different amounts. It is represented by percentage values and is associated with printer inks.
Where to Find Color Channels
You can find Photoshop’s color channels palette window through the top file menu. Click Window > Channels. We will start in RGB mode (Image > Mode > RGB).
Each color in the color mode is now represented by a color channel represented by a grayscale image. There are Red, Green, and Blue channels. The brighter areas of the color channel contain more color. The darker areas represent less color.
For instance, let’s look at the images above and below. The Blue channel is brighter than the Green or Red channels. This is because the image is composed mostly of this great blue sky reflected on the water. We can convert our image to a CMYK color mode (Image > Mode > CMYK). Then our palette is represented by four channels instead of three. It has Cyan, Magenta, Yellow, and Key (Black) channels. The bright and dark areas act like the RGB color mode above.
An image in grayscale color mode (Image > Mode > Grayscale) only has one channel.
How to Select and Edit Channels
Channels can be selected and edited by doing the following: You can paint on only one channel at a time. Paint white to add the selected channel’s color at 100% intensity. Paint with a value of grey to add the channel’s color at a lower intensity. Paint with black to remove the channel’s color. Grayscale images are the standard representation of channels. But there’s an option that lets channels be represented in color if you prefer. You can do the following:
How to Use Alpha Channels
Besides color channels, Photoshop can also store alpha channel information. They are saved on the same palette. Alpha channels are a type of mask that can select levels of grey instead of an outline. This process is very to create complicated selections. A good example is to select the sky in this particular image. This would represent a challenge with standard selection tools. But it is simple with an alpha channel. It only needs two steps:
This alpha channel is then created below the others. You can use it as a layer mask and paint it to add or remove selection areas. And you can convert it to a selection anytime. This makes it possible to control the transparency for specific colors or selections. You can also drag alpha channels between documents. But both documents must have the exact same pixel dimensions. If that is not the case, you can adjust those dimensions with the Image > Image Size function or with the Crop tool (C).
How to Use a Stored Alpha Channel Mask
To use a stored channel mask, use the following steps: You can drag a selection from one open Photoshop image onto another. You can also create a new channel that Photoshop fills with black color by default.
Conclusion
Photoshop channels are a fun and powerful editing process with amazing results. Exploring these options will have a significant impact on your images.
